Getting Started
Imagine effortlessly reviewing check-ins and streamlining operations to enhance your guests' experience. But it's not just about efficiency—Autohost adds value by prioritizing robust security. With Autohost, your guest data is safeguarded, ensuring compliance and peace of mind.
How to set up Autohost?
Jurny will create the account for you, please, reach out to your onboarding representative and request for your Autohost credentials.
Autohost is available only in the Pro Plan. Or you can acquire it from the Custom plan. Check our pricing plans here.
If you already have your Autohost credentials, you can access your account from here.
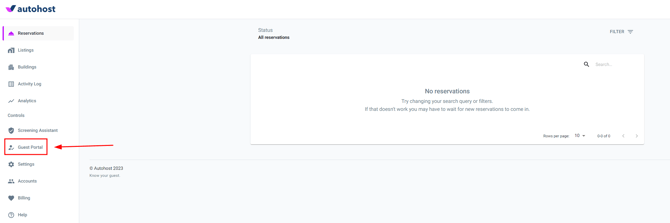
Navigating the Dashboard
Upon logging in, your journey with Autohost begins with an empty dashboard under the reservations tab. It's important to note that Airbnb bookings are not automatically screened; if screening is desired, request this feature through your dedicated onboarding representative.
Head to the Guest Portal on the left menu to tailor the guest experience.
From there, decide which information Autohost should share with guests, assigning colors or levels for clarity. Additionally, set up crucial elements such as house rules, agreements, and the digital signature process.
Autohost categorizes each guest by color, being green as the safest reservation. You can customize things based on each color.
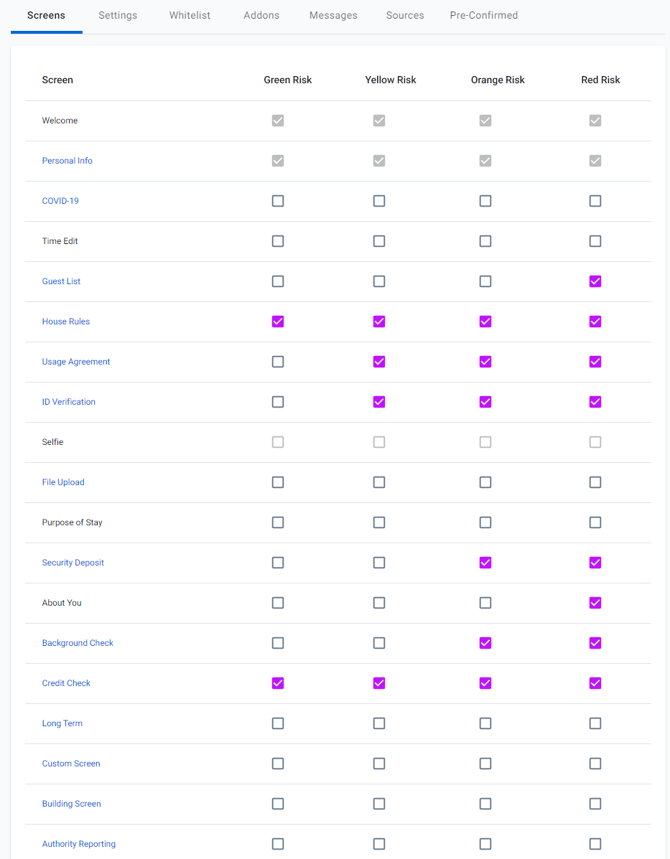
Enabling ID Verification will trigger automatic selfie capture. And by clicking each one of the highlighted screens (Personal info, COVID-19, Guest List, etc.), you will be able to customize each one of them.
Setting up House Rules
Establishing house rules is not just a formality but a crucial aspect of creating a positive and secure environment for hosts and guests alike. By clarifying expectations, promoting safety, and fostering respectful behavior, well-defined house rules contribute to the overall success of rentals and ensure a positive experience for everyone involved.
Once you click the House Rules option as explained above, you can start populating the rules, adding as many rules as you consider.

Extra House Rules are also available in that same section! Don't forget to add some if you need them.

How is the customer signing the agreement?
The customer will be prompted with the rules and all the relevant information based on your settings under the Guest Portal section. However, it is important to clarify that this agreement will have a digital signature. The system will request this to the user, they will need to do two things: a) Agree with the rules, terms, and all the relevant information by clicking on a checkbox, and b) write their full names.
How to establish a Security Deposit?
Establishing a Security Deposit will make you feel more comfortable, and also, the guest will be more committed to leaving things properly and without any damage.
To get started, click on the Security Deposit highlighted option.
![]()
The first thing that Autohost will request is a connection to your Stripe account. Follow the steps provided by Autohost until you see the following screen.
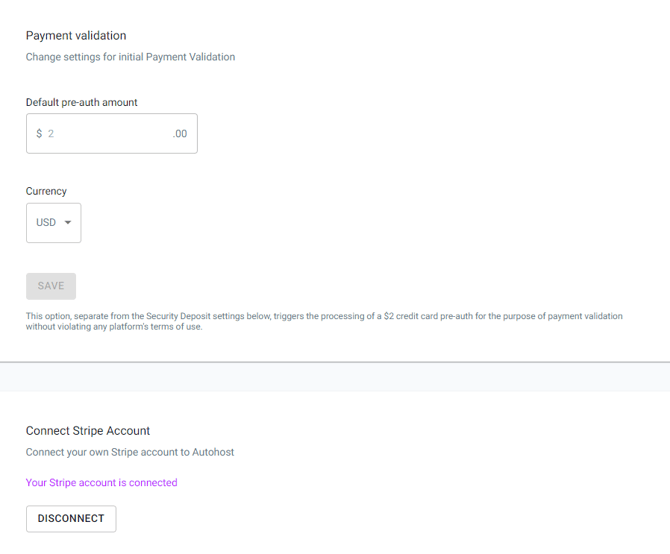
Once here, you can select your desired currency and click on the Save button.
Please, be advised that you cannot change the default pre-auth amount. This pre-auth charge is coming from Autohost to verify if the credit card submitted by the guest is a real card.
In the next section, you will find the Security Deposit field.
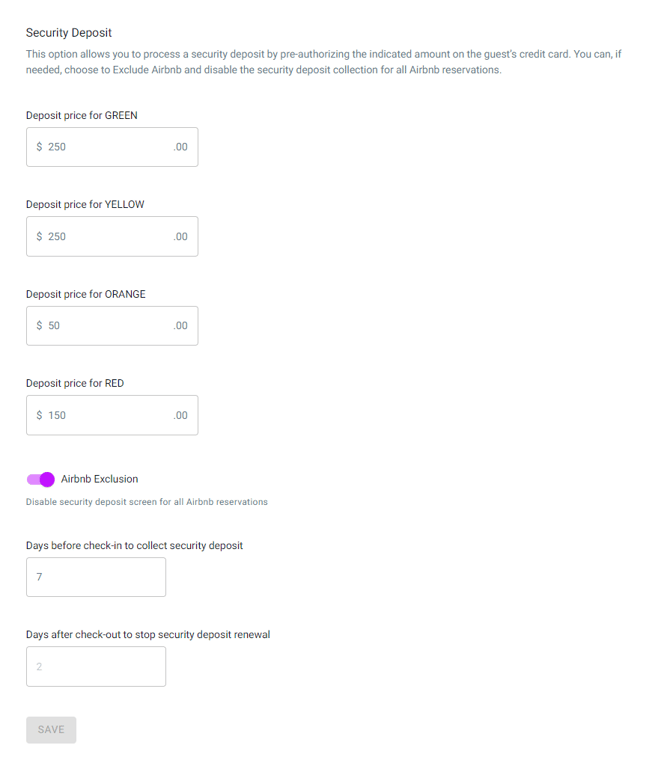
These rules will apply automatically to all your listings. If you want to establish different security deposits based on the listing, you can do this by accessing the settings under each listing on Autohost. The setup there will override the general settings. You will find how to do this below.
The security deposit is an authorization charge, not a fee, and can be customized based on risk color, with a mandatory refresh cycle every 7 days.
Airbnb requests all their users to add that the security deposit will be charged by an external platform somewhere in the description of the listing. If you don't have this, you can be penalized by Airbnb. If you don't want to charge your Airbnb customers a Security Deposit, you can enable the toggle that is highlighted in the previous screenshot.
How to put a Security Deposit on each listing?
If you need to establish a different security deposit based on each unit, you need to access each listing from the Listings section.

From here, you will see the total listings and the active listings. Besides this, you will see the list with all your properties. Each listing will be highlighted, click the desired listing to get further details.
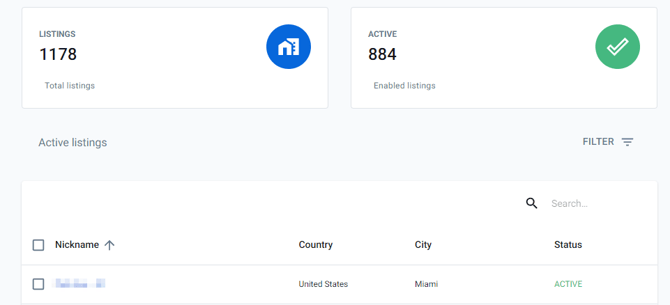
Once you click it, you will have a section bar with multiple options. Click on the Security Deposit option.
Add the Security Deposit based on each color, set up your rules, and this will override the general settings that you established previously!
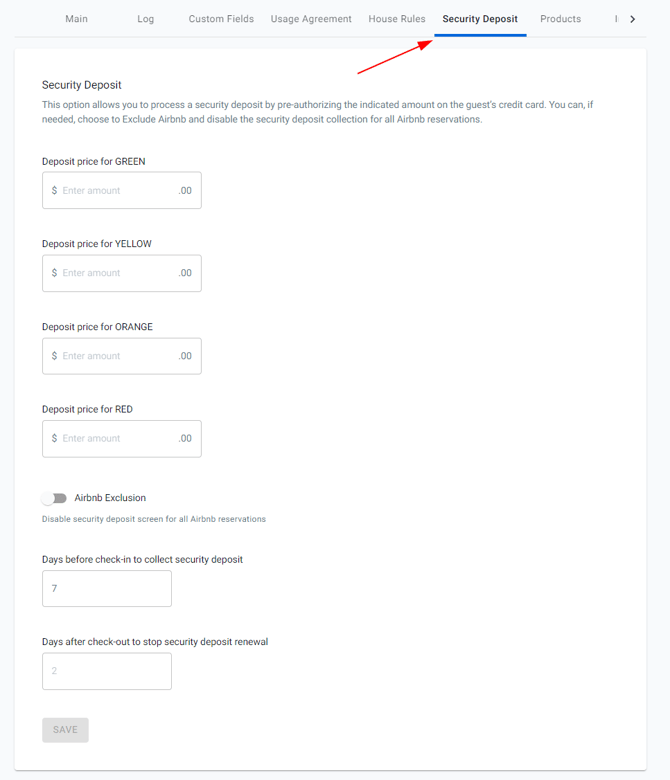
You will need to repeat this process per listing if you need to have different security deposit amounts on each one of them.
How to review the ID, selfie, top concerns, and security deposit?
To review all this information, you just need to review the Details of the reservation once they fill in all the information required by Autohost. If the status of the reservation is Reviewed or Completed, you just need to approve it!
If you click the Reservation, you will be redirected to the Details. From here, you can see the Score, the Color, and the top concerns that Autohost will raise with you, including some great recommendations. In the left menu, you will be able to see all the relevant data related to the guest and the reservation.

If you scroll down a little bit more, you will find the Identification Document section. Where you will be able to see the ID, and the selfie, and request a Credit Check.

How to claim or refund a Security Deposit?
Great question! In the unfortunate case where a guest broke something or left the property in a bad manner, you can claim the Security Deposit.
You just need to go to the customer's reservation (approved status), scroll down in the left menu of that section, and click on the Deposit Actions blue drop-down menu as shown in the following screenshot.

If you already checked the property and everything is fine, you can refund it!
Managing Reservations
Get a grasp of reservation status categories. Pending reservations indicate those not yet checked in. Categorize reservations as pending, review (needing manual approval), and verified (approved but not checked in).

Checked-in customers won't appear on the Autohost general list. If you want to check something about checked-in customers, you can use the search bar on Autohost to get their information.
Declining Guests and Reservation Actions
Keep in mind that declining a guest in Autohost doesn't automatically cancel the reservation. If you rejected the reservation on Autohost, you'd need to cancel the reservation from the OTA.
Important Considerations
To send the check-in instructions after the reservation is approved on Autohost, it is important to add the proper information to the templates.
Learn how to do this in the last two sections of the following guide.
FAQs
Can I buy add-ons on Autohost?
Yes, you can, however, these addons need to be paid directly to Autohost and are not included on your Jurny bill.
How many days is the security deposit available to claim after checkout?
You will have 2 days to claim after the guest leaves the property.
Any questions at all? Let us know at support@jurny.com!