Create a Reservation from the Reservations Page
-
Navigate to the Reservations tab in your dashboard.
-
Click Add New in the upper-right corner.
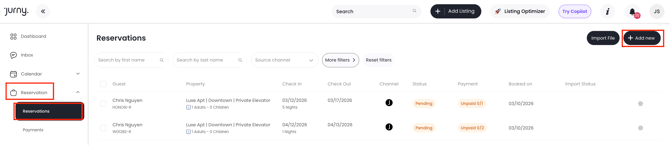
A New Booking popup window will appear where you can begin creating the booking.
Creating a Reservation from a Calendar
You can easily create a reservation directly from the calendar, too.
-
Click on your desired check-in date on the calendar.
-
A small menu will appear.
-
Select “New Reservation.”
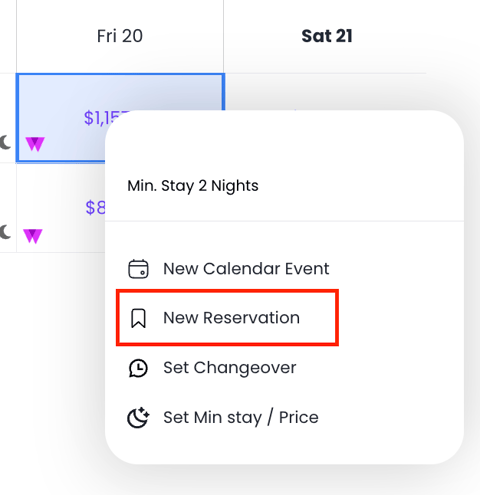
A New Booking popup window will appear where you can begin creating the booking.
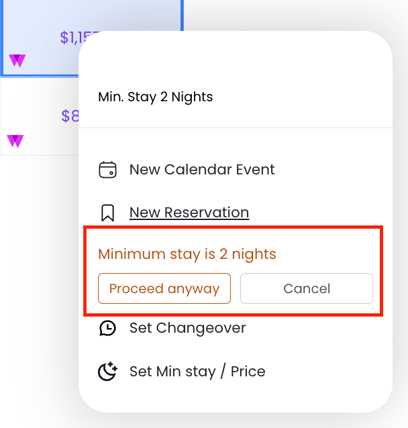
If the selected property has a higher minimum night requirement than your chosen stay, the system will automatically notify you.
-
You will see a prompt displaying the minimum number of nights required for that property.
-
The system will then ask if you would like to proceed despite the restriction.
2. Select Listing, Occupancy, and Dates
Inside the booking popup:
-
Select the Listing the guest wants to book.
-
Enter the Max Occupancy for the reservation.
-
Choose the Check-in and Check-out Dates.
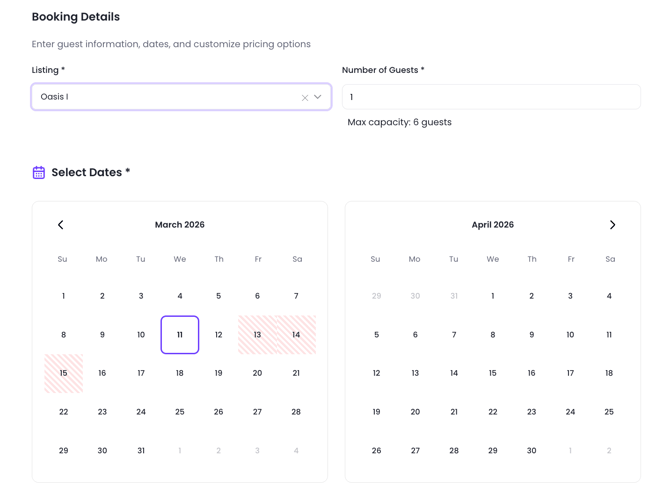
The red slashed dates on the calendar signifies dates that aren't available anymore.
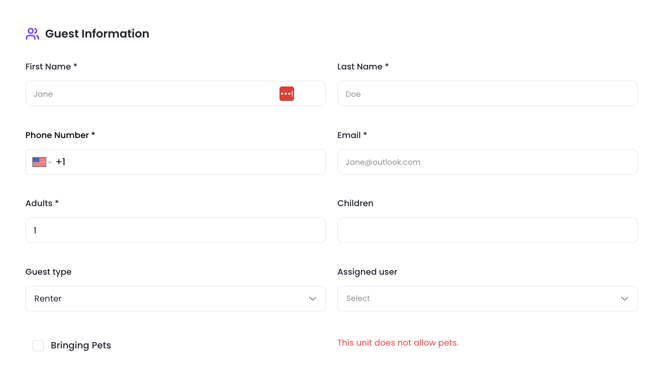
3. Add Guest Information
Enter the guest’s details, including:
-
Guest Name
-
Email address
-
Phone number
- Number of Adults and Children
- Guest Type will be Renter by default, you can change this to another type if necessary.
- You can also assign the reservation to a member of your team by choosing an Assigned User
4. Decide Whether to Include Pricing and Summary
You will see a checkbox labeled “Include Price and Summary.”
-
Checked → Pricing details and payment options will be included in the booking or quote.
-
Unchecked → The booking will proceed without pricing information.
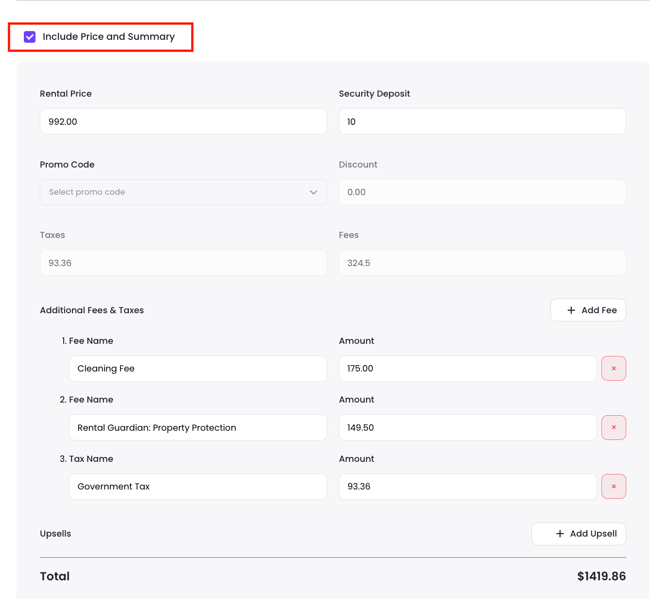
Tip: This option works best if you need to collect payment from the guest using a payment link or if you need the finance breakdown included in the booking for reporting purposes.
Customize Pricing, Fees, and Upsells (If Enabled)
If Include Pricing and Summary is enabled, you will have additional options:
Adjust Pricing
You can modify:
-
Rental price
-
Cleaning fees
-
Taxes
-
Additional fees
Apply a Promo Code
You can also apply a promo or coupon code directly within the booking to adjust the final price for the guest.
Add an Upsell
You can also add optional upsells to the booking, such as:
-
Early check-in
-
Late checkout
-
Extra services
-
Add-ons offered to guests
Upsells are a great way to increase revenue while giving guests additional convenience options.
6. Split Payments into Installments (Optional)
If you need the guest to pay in multiple payments, enable Split into Installments.
-
Tick the checkbox “Split into Installments.”
-
Enter the number of payments by clicking the "Add Payment" button.
-
Add a name for the payment, then the amount for each installment.
-
Set the due date for each payment.
-
Select the method of payment.
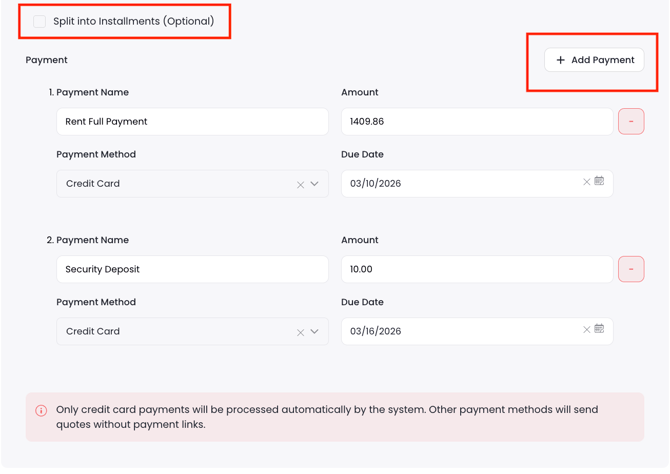
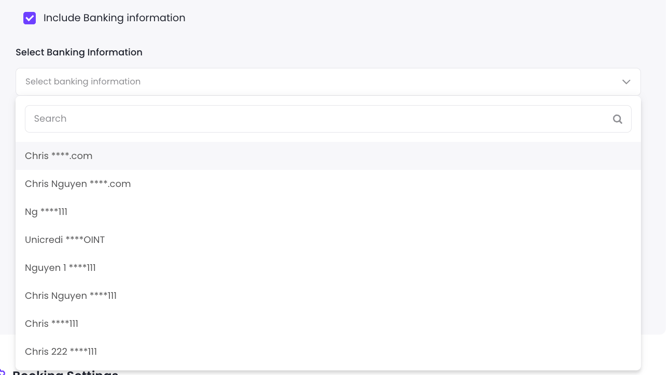
If you select Bank Transfer as the payment method, you'll have the option to include your bank information for the guest. You can either select from the Select Bank Information dropdown of your saved bank information or add your bank details manually.
8. Add Your Bank Information (For Bank Transfer Payments)
To allow guests to pay via Bank Transfer, you first need to save your banking details in the system.
Steps to Add Banking Details
-
Go to Setup.
-
Click the Booking & Payment tab.
-
Select Banking.
-
Click the + icon in the upper right corner.
-
A pop-up window will appear where you can enter your bank information.
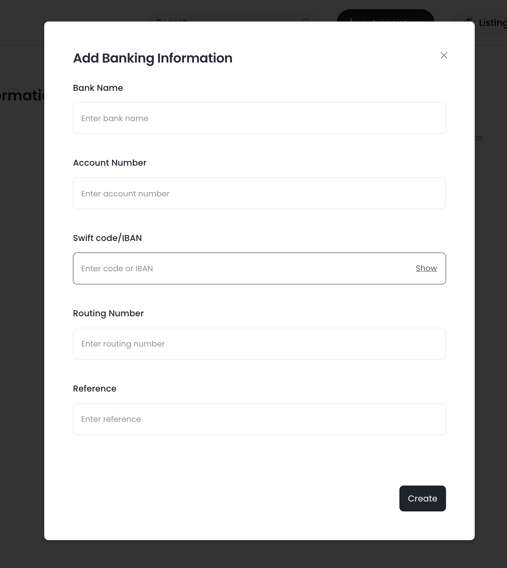
Information You Need to Fill In
Bank Name
The name of the financial institution where the payment should be sent.
Account Number
The bank account number that will receive the guest’s payment.
SWIFT Code / IBAN
International banking codes are used to identify your bank and account for cross-border transfers. This ensures international guests can send the payment correctly.
Routing Number
A routing number is a bank identifier used for local transfers to make sure the payment is sent to the correct bank.
Reference Code
This code helps identify which reservation the payment belongs to. It will automatically be prefilled with the reservation code in the email sent to the guest, making it easier to match incoming bank transfers to the correct booking
Once saved, these bank details will appear in the dropdown menu when selecting Bank Transfer as a payment method in the booking.
9. Configure Booking Settings
Next, complete the Booking Settings section.
Select the following:
-
Rental Contract
-
Refund Policy
-
Hold Until Date (how long the dates will be reserved for the guest)
-
Preparation Time
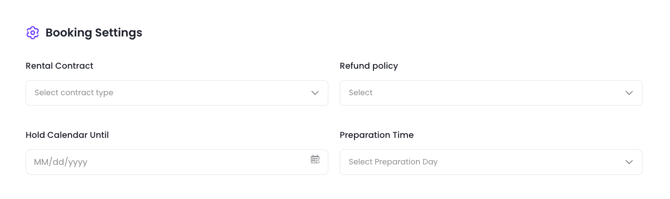
If the Include Pricing and Summary check box is NOT selected, you will proceed to Booking Settings immediately after adding the guest details. If the checkbox is selected, you will first configure pricing, fees, upsells, and payment settings before reaching this step.
10. Add CC Emails and Email Settings
If Include Pricing and Summary was enabled, the next step after Booking Settings allows you to manage if you want the quote to be sent to the guest's email and if you want to add additional emails to be CC'd on the quote.
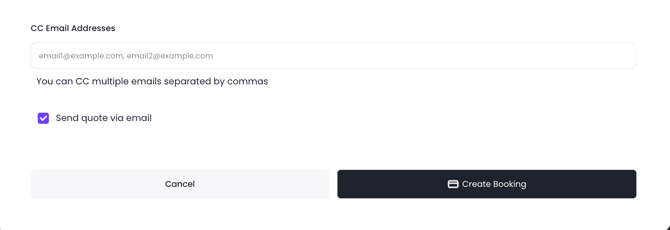
The option “Send Quote via Email” is enabled by default. If you do not want to send the quote via email, make sure to untick the Send Quote via Email checkbox before creating the booking.
11. Create the Booking
Once all information is completed:
-
Review the booking details.
-
Click Create Booking.
Your reservation or quote will now be created in the system.
Reservation Confirmation
Here's the deal – creating the reservation won't automatically block your calendar. If you are collecting payment for the booking using the payment link they will receive when you send a quote, then, once the payment has been processed, the booking will be marked reserved and paid automatically.
If you don't need to collect a payment for the booking, then you'll need to confirm it first.
To confirm it, click on the reservation that was created in your calendar. From there, click Accept Reservation.
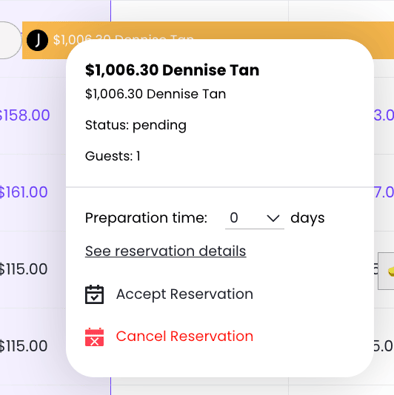
Voila! Now your calendar is blocked!
If you need help or have any questions, don’t hesitate to reach out. Contact your Customer Success Manager or our support team at support.jurny.com – we’re happy to assist.