Quick Navigation Index
To easily navigate through this guide, click on any of the sections below to jump directly to the information you need:
- What's New in the Template Builder
- Understanding Triggers vs. Conditions
- Step 1 — Creating or Editing a Template
- Step 2 — Selecting a Trigger
- Step 3 — Setting Up Conditions
- Step 4 — Using the Last-Minute Booking Fallback
- Step 5 — Chaining Templates (After Template A is Sent)
- Choosing Recipients & Channels
- Condition Reference: Full List
- Next Steps
What's New in the Template Builder
The Template Automation Builder has been redesigned from the ground up to give you more control over when, how, and to whom your messages are sent — without the complexity.
Here's what changed:
- Triggers are now organized by category with a searchable dropdown — no more scrolling through a flat, unlabeled list

- "Advanced Rules" is now called Conditions — a cleaner, plain-language row-based interface that replaces the old split system

- New trigger events added — covering the full reservation lifecycle (Booking Created, Reservation Pending, Payment Added, and more)
%2012.03.21%20p.m..gif?width=589&height=364&name=Grabaci%C3%B3n%20de%20pantalla%202026-06-12%20a%20la(s)%2012.03.21%20p.m..gif)
- Last-minute booking fallback — a built-in solution so your messages never silently skip same-day or next-day bookings
- Template chaining — send Template B a set time after Template A goes out
Understanding Triggers vs. Conditions
Before building your first rule, it's important to understand the difference between these two concepts — they work together but serve different purposes:
| Trigger | Condition | |
|---|---|---|
| What it is | The event that wakes up the rule | The state that must be true for the message to be sent |
| When it's evaluated | At the moment the event occurs | At the scheduled send time |
Why does this matter? A reservation can be confirmed and then later modified or canceled before your scheduled message goes out. By adding Reservation Status is Confirmed as a Condition, you ensure the template doesn't fire if things have changed by send time.
Tip: You can use the same concept in both Triggers and Conditions intentionally — this is a feature, not a conflict.
Step 1 — Creating or Editing a Template
To get started:
- Go to the Inbox in the left navigation
- Scroll to Settings, then select Templates
- Click + New Template or open an existing one to edit
The template form is now organized in a logical order:
- Template Name — for internal reference only; guests never see this
- Subject — visible only for email templates; set this before writing your message body
- Message Content — the body of your template
- Recipient & Channel — who receives the message and how
Step 2 — Selecting a Trigger
The Trigger is the event that starts the automation. Click the trigger dropdown to open it — triggers are now organized into labeled groups, and you can search at the top of the list.
📅 Booking
- Booking is Created — fires when a new booking is created (before confirmed status)
- Booking Dates Changed — fires when check-in or check-out dates are modified
- Check-in / Check-out Time Changed — fires when arrival or departure time is updated (not the date)
- Booking Property / Listing Changed — fires when a property is swapped on an existing reservation
- Booking Payment Added — fires when a new payment is recorded
- Booking Canceled — fires when a booking is canceled.
🔎 Inquiry
- Inquiry Created — fires when a guest submits an inquiry
- Inquiry Accepted — fires when you accept an inquiry
- Inquiry Declined — fires when you decline an inquiry
- Booking Request Received — fires when a guest submits a formal request requiring your approval (available for Airbnb, VRBO, Booking.com, and direct bookings with Request to Book enabled)
🧳 Guest Journey
- Reservation Confirmed — fires when the reservation is confirmed
- Reservation Expired — fires when a booking request or hold expires
- Check-in Day — fires following the check-in date (relative timing: e.g., 3 hours before)
- CheKin Completed by Guest (Integration) ⚠️ — fires when the guest completes the check-in process via the CheKin integration. This event depends on a third-party integration.
- Check-out Day — fires on the guest's check-out date
- Day of Week — fires on a specific day of the week while the guest is checked in
💳 Payments
- Payment Due — fires when a payment is coming due
- Payment Failed — fires when a payment attempt is unsuccessful
- Payment Successful — fires when a payment is processed successfully
- Full Payment Successful — fires when the balance is paid in full
- Refund Issued — fires when a refund is processed
🤖 Automations
- After Template A is Sent — chain a follow-up template after a previous one is sent.
Step 3 — Setting Up Conditions
Conditions replace what was previously called "Advanced Rules." They let you define what must be true about the reservation at the moment the template is scheduled to send.
Each condition follows this format: [Criteria] is [Operator] [Value]
To add a condition, click + Add Condition below the trigger. Criteria are organized by category in a dropdown:
📆 Booking Date & Time
| Criteria | Example Use |
|---|---|
| Booked Time of Day | Send a late-night booking message if booked after 10 PM |
| Booked On Day of the Week | Skip Sunday bookings from a specific automation |
| Booked On Day of the Month | Target bookings made at the start of the month |
| Booked On Month of the Year |
Send a seasonal message for winter bookings |
| Number of Nights | Send mid-stay follow-up only for stays over 7 nights |
📅 Check-in & Check-out
| Criteria | Example Use |
|---|---|
| Check-in Day of the Week | Send a weekend welcome if check-in is on a Friday |
| Check-in Month of the Year | Promote local events for summer check-ins |
👥 Guests
| Criteria | Example Use |
|---|---|
| Guest Type | Send an owner-specific message to Owner or Owner Guest |
| Number of Adults | Send a noise policy reminder when adults > 4 |
| Number of Children | Send kid-friendly tips when children > 0 |
| Number of Infants | Offer a baby cot when infants > 0 |
| Number of Pets | Send pet policy confirmation when pets > 0 |
| Number of Guests (total) | Send large-group instructions when total guests > 6 |
💰 Financial
| Criteria | Example Use |
|---|---|
| Payment Status 🔄 | Send a payment reminder only if status is Partially Paid |
| Discounts Applied |
Send a promo-specific welcome when a discount code was used |
| Payment Method on File 🔄 | Follow up with guests who have no card on file |
📋 Statuses
| Criteria | Example Use |
|---|---|
| Reservation Status 🔄 | Add as a safety check to ensure the booking is still Confirmed |
🏷️ Tags
| Criteria | Example Use |
|---|---|
| Inbox Tag 🔄 | Send a follow-up only to conversations tagged "Urgent Assistance" |
| Inbox Tag 🔄 | Suppress a review request for conversations tagged "Complaint" |
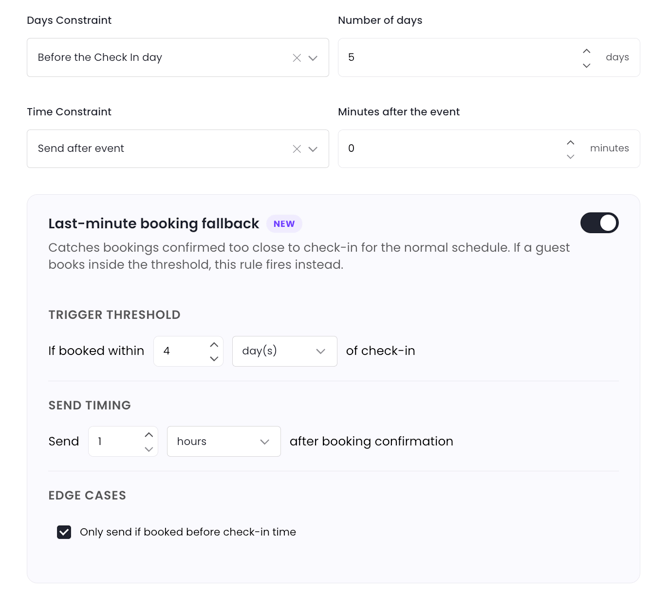
Step 4 — Using the Last-Minute Booking Fallback
The problem this solves: A rule like "Send check-in info 3 days before check-in at 11 AM" will silently skip any booking confirmed after that time has already passed — same-day and next-day bookings never receive that message.
The fix: The Last-Minute Fallback is now built directly into the same rule — no duplicate rules needed.
When setting your schedule timing for a Check-in or Reservation Confirmed trigger, you'll see an optional toggle: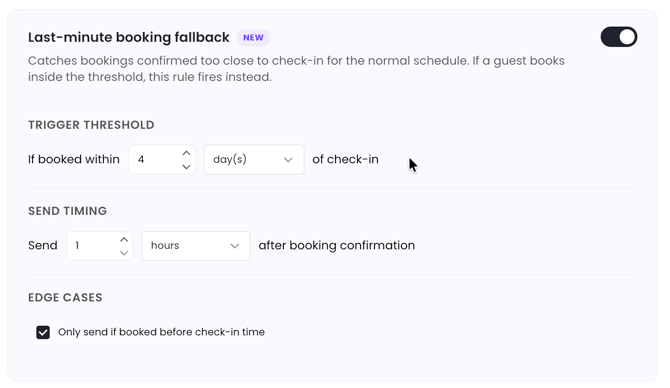
Here's what each field controls:
- "Within X days of check-in" — you define what counts as last-minute for your operation
- "Send X minutes/hours after booking confirmation" — controls the delay between the confirmation message and this template, so guests aren't hit with multiple messages at once
- "Only if booked before check-in time" — useful when you need to review same-day bookings before sending instructions
- "If booked after check-in time → [action]" — choose: Do not send / Send anyway / Notify host only
| Scenario | What Happens |
|---|---|
| Booked 5 days before check-in | Normal rule fires — 3 days before at 11 AM |
| Booked 1 day before, 9 AM (check-in at 3 PM) | Fallback fires — 30 min after confirmation |
| Booked same day, 1 PM (check-in at 3 PM) | Fallback fires — 30 min after confirmation |
| Booked same day, 5 PM (check-in was at 3 PM) | Your selected "after check-in time" action applies |
Tip: This fallback only appears for triggers where timing relative to check-in matters — primarily Check-in Day and Reservation Confirmed.
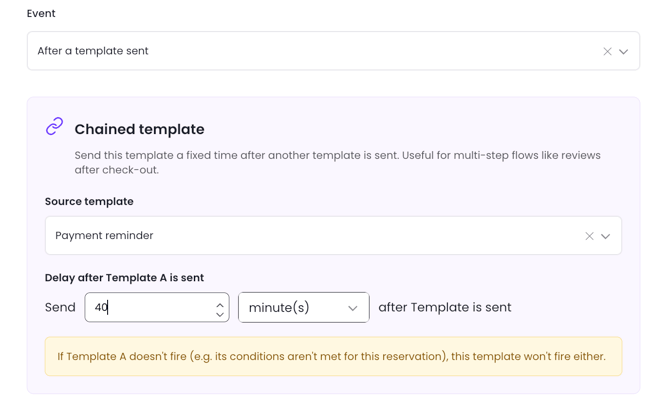
Step 5 — Chaining Templates (After Template A is Sent)
You can now send one template in response to another being sent — perfect for multi-step guest communication flows.
In the Trigger dropdown, select After Template A is Sent, then:
- Choose the template that must be sent first (Template A)
- Set the delay: X minutes / hours / days after Template A is sent
Example: Send "Review Request" 2 days after "Check-out Instructions" is sent.
Note: Template chaining evaluates based on when Template A is actually sent — not when it was scheduled.
Choosing Recipients & Channels
After writing your message, select who receives it and how. The recipient options have been renamed for clarity:
| Option | What It Means |
|---|---|
| Guest via OTA Inbox | Message is sent through the booking channel's inbox (e.g., Airbnb, VRBO) |
| Guest Email | Uses the guest's email address stored in the platform |
| Property Owner | Sent to the owner |
| Team Member with Jurny User Access | Sent to a user on your Jurny account |
| Third Parties | For external contacts who don't need Jurny access (e.g., cleaning teams) |
| Guest Email Provided via Autohost | Uses the email address provided through your Autohost screening integration |
Tip: Selecting SMS or WhatsApp will display a dedicated message box with character limit guidance. Keep SMS messages concise — messages that exceed platform limits will fail to send.
Condition Reference: Full List
Here's a complete quick-reference table of all available conditions:
| Category | Condition | Type | Dynamic |
|---|---|---|---|
| Booking | Booked Time of Day | Date/Time | No |
| Booking | Booked On Day of the Week | Date/Time | No |
| Booking | Booked On Day of the Month | Date/Time | No |
| Booking | Booked On Month of the Year | Date/Time | No |
| Check-in & Check-out | Check-in Day of the Week | Date/Time | No |
| Check-in & Check-out | Check-in Day of the Month | Date/Time | No |
| Check-in & Check-out | Check-in Month of the Year | Date/Time | No |
| Check-in & Check-out | Check-out Day of the Week | Date/Time | No |
| Check-in & Check-out | Check-out Day of the Month | Date/Time | No |
| Check-in & Check-out | Check-out Month of the Year | Date/Time | No |
| Check-in & Check-out | Number of Nights | Numeric | No |
| Guests | Guest Type | List | No |
| Guests | Number of Adults | Numeric | No |
| Guests | Number of Children | Numeric | No |
| Guests | Number of Infants | Numeric | No |
| Guests | Number of Pets | Numeric | No |
| Guests | Number of Guests (total) | Numeric | No |
| Financial | Payment Status | List | 🔄 Yes |
| Financial | Discounts Applied | List | No |
| Statuses | Payment Method on File | List | 🔄 Yes |
| Statuses | Reservation Status | List | 🔄 Yes |
| Tags | Inbox Tag | List | 🔄 Yes |
Next Steps
Now that you're familiar with the new Template Builder, here's what we recommend:
- Review your existing templates and check if any rules need an adjustment.
- Identify any rules that handle last-minute bookings manually — you can now simplify those using the built-in fallback
- Explore the new trigger events to see if there are moments in your reservation lifecycle you've been handling manually